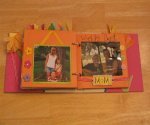
American Independence Day Scrapbooking Layout
I have written down below, the list of Scrapbooking supplies used to create this American Independence Day scrapbooking Layout titled "Proud To Be American".
|
|
|
Prev Next |
Scrapbooking Kits - Scrapbook by: Catherine Castillo |

American Independence Day Scrapbooking Layout - Steps by Steps Instructions
- Start with Maroon Cardstock. Cut One 4x6” rectangle out of blue patterned paper and two 5x6” rectangles out of the same paper.
- Lay two 5” x 12” flag paper strips on top of each other and cut a curved line at the top and bottom.
- Cut two 2” x 12” Dark blue pieces of cardstock and one 1 ½” x 5” piece.
- Cut a large circle (8” diameter) out of blue cardstock and another one 7 ¾” diameter out of the middle of that. Discard the small circle and keep the ring.
- Cut another 8” diameter circle out of white cardstock and glue to the back of the blue ring.
- Glue down the blue cardstock strips to the bottom of both pages. Overlap those with the flag curved pieces.
- Fold a piece of white ribbon and attach to the bottom left of the blue 4x6 rectangle with a metal brad. Glue the rectangle to the top left of the left page.
- Attach several embellishments to the circle as shown and stamp a glue the circle so that it is slightly overlapping the blue rectangle. Doodle a border using a white pen on the blue circle.
- Paint some chipboard letters “PROUD” in maroon and attach to the bottom of the circle as shown.
- Mat the smaller blue cardstock strip on a white cardstock and attach white letters “to be an” on top. Doodle a black border on the white cardstock.
- Stamp a swirl above the “PROUD” and add gems. Also stamp one to the left of “to be an.”
- Fold up a piece of ribbon and staple to the top of one of the blue 5x6” rectangles (top left) and place a metal clip on the right side. On the other blue 5x6 rectangle, staple a white piece of ribbon across the right top corner. Glue these rectangles down to the right page as shown and attach a chipboard square at the bottom right of the rectangle on the right.
- Stamp “AMERICAN” on white cardstock and cut out. Paint two chipboard brackets white and attach all of these as shown. Add gems and a star to the stamped letters as shown and doodle the borders of the brackets with a black pen.
-- By Catherine Castillo
Remember scrapbooking ideas is limited only to your own imagination. We are all unique and have different lives, careers, hobbies, experiences etc from others.
Capitalize on your uniqueness and turn it into your own unique scrapbooking pages.
Subscribe To Newsletter
All scrappy ideas
It keeps you informed about unique themed scrapbooking ideas, free layouts, Product reviews, supplies, tips, information etc.
Or you can even share your ideas, suggestions feedback etc that will help us improve our scrapbooking experience.


Recent Articles
-
Pet Scrapbooking Layout
Nov 11, 23 05:34 PM
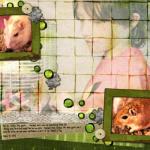 This Pet Scrapbooking Layout was inspired by St Paddy's Day and created to celebrate my son's new pets. I used Heidi Kuester's Lucky Lou page kit from
 -
Free Scrapbooking Layouts Templates
Sep 11, 23 03:37 PM
Get free Scrapbooking Layouts Templates like Baby scrapbook layout, Valentine scrapbook, Love layouts, Family scrapbooking, wedding... -
Scrapbooking ideas, tips to help you make a wonderful scrapbook
Sep 11, 23 03:12 PM
 Looking for scrapbooking ideas? Get all the exciting ideas,suggestions,tips and techniques for your Baby, Wedding, Military Personnel and Lots More

Scrapbook Contest
Win Huge Prizes participate in our Scrapbook Contest, It's easy and fun.

Related Pages


Affiliated Links