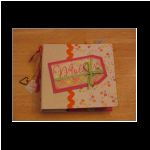
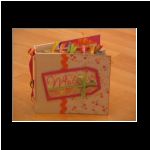
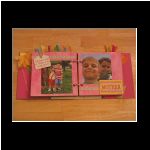
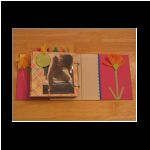
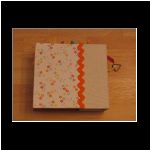
Bo Bunny Mother Scrapbook Album
Scrapbook Supplies used in creating this, Mother Scrapbook Album:
|
|
|
|
|
|
|
|
|
|
|
|
|
|
Album Designed by: Cathy Castillo
All scrappy Ideas Design Team
Steps By Steps Guide On How to Create Similar Bo Bunny Mother Scrapbook Album
Use distress ink on all cardstock before gluing down!
1. Use two floral pieces for the front and back cover. These are approximately 4 ½” x 6 ½”.
Using Mod Podge and a foam brush, adhere these pieces to the front and back. Put a good coat of MP on the surface of the book and use a credit card or chipboard to smooth out starting in the middle and working your way to the corners. Do this for the back of the book as well.
2. Open the book and MP two pink 4 ½” x 6 ½” pieces to the inside front and back covers. Set the book aside to dry.
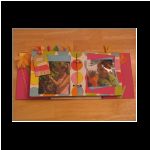
3. Assemble the pages as follows with MP (all paper should be cut 6” x 6”):
Page 1: Plaid
Page 2(Back of Page 1) and page 3: Stripe
Page 4(back of page 3) and page 5: Aqua Bling
Page 6(back of page 5) and page 7: Yellow Diamond Pattern
Page 8(back of page 7) and page 9: Pink Swirls
Page 10(back of page 9) and page 11: Polka Dots
Page 12(back of page 11) and page 13: Orange Bling
Page 14(back of page 13) and page 15: White floral
Page 16(back of page 15): plaid
4. The edges of your pages may need to be slightly sanded. Sand them now. After sanding the pages, use distress ink to ink the edges of each page.
5. Using a crop-a-dile, punch a hole in the middle of the spine, about ½” from the top. Set with an eyelet and tie on the ribbon for the two charms.
6. Remove the “friend” and “wife” stickers from the sticker sheet and place back to back. Punch a hole through the top middle and set an eyelet. Attach this to the end of one of the ribbons. Tie the metal charm to the bottom of the other ribbon.
7. Using glue dots, attach large orange rickrack ribbon to the seam on the front and back of the binder. Do the same with small aqua rickrack on the inside cover and back.
8. On the back cover, fold the orange flower in the same way with green cardstock as the triangle. Using green ribbon, Make a 4” stem for the flower and the sides and glue down. Glue the flower on top of the stem.
How to Make Bo Bunny Mother Scrapbook Album Pages
Steps by steps instructions showing how you can create this Bo Bunny Mother Scrapbook Album pages
- Remove the “Mother” Sticker from the sticker sheet and use green gingham ribbon to place over the sticker and tie. Place the sticker on the pink cardstock of its same length. Cut the cardstock to match the shape of the tag and ink the edges. Using foam squares or pop dots, attach at an angle to the front of the binder.
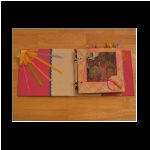
- On the inside front cover, cut a piece of yellow paper into a triangle. Fold over the large yellow flower into fourths. Using glue dots, fold the triangle around the center of the flower to make a sun. Glue down in the top left corner. Cut five lengths of ribbon for the rays and glue them down under the petals of the flower.
- Find the white flower circle on the sticker sheet. Punch two holes in the center for eyelets and tie a ribbon through. Use foam squares to pop this up in the bottom right corner.
- Stamp turn mounts from Autumn Leaves Doodle Staples set and cut out of aqua bling paper. Adhere to the left side of the page.
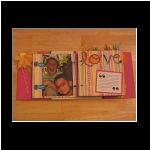
- “Love” was stamped with Autumn Leaves Scribbles Alphabet and cut out. Glue to the top of the page. Mat the quote journaling square (stamped with Autumn Leaves Journaling Stamps) to pink cardstock and adhere to the bottom left of the page at an angle.
- Stamp an Autumn Leaves Flourish on the left side of the page and Glue a flower with a rhinestone in the center to the top of the flourish. Using Corner stamp, cut out and glue down the yellow page corners to the top right and bottom right and doodle borders on them.
- Punch six holes at equal distances in the top of the page and set eyelets of different color. Tie ribbon through the eyelets. Tie ribbon through the small sticker tags and attach along the bottom in an offset row.
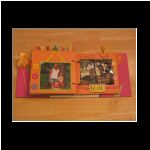
Page 6: Yellow Diamond Pattern
- Glue down three flowers with rhinestone centers to the bottom left page in an “L” shape.
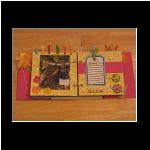
- Stamp and cut out a moment journaling tag (Autumn Leaves) and cut it out. Mat it on aqua cardstock and punch a hole through the top and tie with two ribbons. Find the paper buttons and cut them out. Punch small holes in them and tie with ribbon. Find the pink cardstock strip and place about 2” from the top of the page. Glue down the journaling tag on top so that the ribbon sticks out of the top of the book. Stamp stitches underneath.
- Cut the green sticker border in half. Put one half ½” from the top of the page (the other half will go on)
- Cut the tag that says “All that I am or Hope to be I owe to my Mother” so that Mother is cut off. Punch a hole through the top and set an eyelet. Tie with two ribbon pieces and attach to the left side of the page with foam squares.
- Put the other border ½” from the bottom. Mat the “Mother” part of the tag on yellow cardstock and pop up on the left bottom overlapping the border.
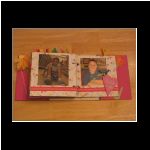
- Set an eyelet in “My Mother My Friend” tag and tie with ribbon. Place a 2” x 4” aqua strip on top of page and overlap with the tag (pop up).
- Glue down a 4” x 5” pink cardstock mat at an angle and the aqua cardstock square at the opposite angle on top of it.
- Glue down a 4” x 5” green cardstock mat about ½” from the bottom of the page, about 1” from the left side. Attach ribbon above it in an upside down “V” to make it look like a hanging picture. Place three flowers to the left of it with rhinestones.
- Using a stencil (or simply handwrite), Write “World’s Best” on the top of the page. Attach yellow cardstock to the back of the plaid ribbon slide and stencil “MOM” in the middle. Set eyelets in the slide and thread ribbon through across the bottom of the page. Glue down ribbon with glue dots. Put the three sticker buttons on the right side of page.
- About ½” from the bottom of the page, glue down the “XOXO” ribbon (or other) across page 14 and 15.
- Punch a hole in the left side of the top of the heart sticker and tie with two ribbons. Pop up over the ribbon on the left bottom of the page.
- Punch a hole in the top of the green circle sticker and set an eyelet. Tie with ribbon and pop up on top left of page. Draw in a squiggly dotted line to look like the butterfly is flying.
- On the back cover of the mother scrapbook album, fold the orange flower in the same way with green cardstock as the triangle. Using green ribbon, Make a 4” stem for the flower and the sides and glue down. Glue the flower on top of the stem
You’re done! Enjoy!
Share your Mother Scrapbooking
Layouts with fellow scrappers!!!
Simply use the form below to upload your layout and its "story". Including the supplies. The steps by steps procedures on how the page was created. Every Layout has a story and it's helps others give you the constructive advice that will make you a better scrapper.
PLEASE NOTE: Only Mother Scrapbooking Layouts will be accepted on this page.
Remember scrapbooking ideas is limited only to your own imagination. We are all unique and have different lives, careers, hobbies, experiences etc from others.
Capitalize on your uniqueness and turn it into your own unique scrapbooking pages.
Subscribe To Newsletter
All scrappy ideas
It keeps you informed about unique themed scrapbooking ideas, free layouts, Product reviews, supplies, tips, information etc.
Or you can even share your ideas, suggestions feedback etc that will help us improve our scrapbooking experience.


Recent Articles
-
Pet Scrapbooking Layout
Nov 11, 23 05:34 PM
 This Pet Scrapbooking Layout was inspired by St Paddy's Day and created to celebrate my son's new pets. I used Heidi Kuester's Lucky Lou page kit from
 -
Free Scrapbooking Layouts Templates
Sep 11, 23 03:37 PM
Get free Scrapbooking Layouts Templates like Baby scrapbook layout, Valentine scrapbook, Love layouts, Family scrapbooking, wedding... -
Scrapbooking ideas, tips to help you make a wonderful scrapbook
Sep 11, 23 03:12 PM
 Looking for scrapbooking ideas? Get all the exciting ideas,suggestions,tips and techniques for your Baby, Wedding, Military Personnel and Lots More

Scrapbook Contest
Win Huge Prizes participate in our Scrapbook Contest, It's easy and fun.

Related Pages


Affiliated Links